Do you struggle with weak Wi-Fi signals in certain areas of your home? Are you tired of dead zones where your internet connection is nonexistent? Well, we’ve got the solution for you! Introducing D-Link Range Extender – a powerful device that helps amplify and extend your Wi-Fi signals, eliminating those pesky dead zones once and for all.
What is Dlinkap.local?
Dlinkap.local is the admin panel of the D-Link Range Extender that allows you to set up and manage your wireless settings effortlessly. By accessing Dlinkap.local, you can easily boost and optimize the coverage of your home Wi-Fi network. With D-Link’s range extenders, you can take signals from your existing Wi-Fi network, amplify them, and rebroadcast them, covering even the most stubborn dead zone areas in your home.
How to Login to Dlinkap.local?
Setting up and managing your D-Link Range Extender is a breeze, thanks to the user-friendly Dlinkap.local admin interface. Here’s a step-by-step guide to logging into the Dlinkap.local admin panel:
- Power on your Wi-Fi Range Extender and connect your PC to the Extender’s Wi-Fi Network.
- Open your browser and type in either
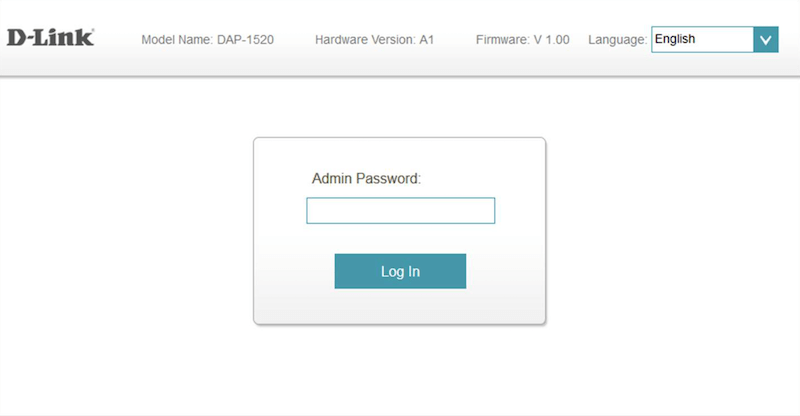
http://dlinkap.localor192.168.0.50, then hit Enter. - The login web page will appear.

- Enter the default username, which is
admin, and leave the password field blank. - Click on the “Log In” button.
- Voila! You have successfully logged into the Dlinkap.local admin panel.
How to Set up Dlinkap.local?
If you’re setting up your D-Link Range Extender for the first time, don’t worry – we’ve got you covered! Just follow these simple steps:
- Once you’re logged in, the setup window will appear, prompting you to connect to your pre-existing Wi-Fi network.
- Select your pre-existing Wi-Fi Network from the list and enter its password to join it.
- Once your D-Link Range Extender is connected to your pre-existing Wi-Fi Network, you will be asked to enter the Wi-Fi Network Name and Password for the new network.
- Enter the new Wi-Fi SSID and Password, then click on the “Next” button.
- For added security, you will be prompted to enter the admin password. Enter the admin password in the given field.
- A summary of both the pre-existing Wi-Fi Network and the extended Wi-Fi Network will be displayed on the screen. Click on the “Finish” button to complete the setup process.
- The D-Link Range Extender will now reboot. Once it’s back online, you can connect your devices to the extended Wi-Fi network and enjoy seamless connectivity throughout your home.
Forgotten Range Extender Password?
Accidentally forgot the Wi-Fi or login password for your D-Link Range Extender? No worries! You can easily reset the extender to its factory defaults by following these simple steps:
- While the range extender is switched on, locate the “Reset” button at the back of the device.
- Take a needle or paper clip and press and hold the “Reset” button for about 10-15 seconds.
- When the LED lights start blinking, release the button.
- The D-Link Range Extender will automatically reboot. Once it’s back on, all the settings, including the changed password, will be reverted back to the factory defaults.
- Now, you can set up the Range Extender again by following the previously mentioned steps.
Say goodbye to weak Wi-Fi signals and hello to speedy internet access in every corner of your home with the D-Link Range Extender. With the Dlinkap.local admin panel, managing your wireless settings has never been easier. Don’t let dead zones slow you down – take control of your Wi-Fi network today!