Are you tired of having a weak WiFi signal in certain areas of your home or office? Say goodbye to dead zones and hello to a stronger, more reliable connection with the WiFiblast Range Extender. In this article, we will guide you through the simple process of setting up and logging into your WiFiblast device, so you can enjoy an extended WiFi range without the hassle of laying physical cables.
Step-by-Step Setup Guide for WiFiblast Range Extender
Setting up your WiFiblast Range Extender is a breeze. Just follow these simple steps:
-
Connect the extender to a power socket, and then connect your PC or laptop to the extender using either an Ethernet cable or WiFi connection.
-
By default, the WiFi SSID is unsecured and does not require a password, so you can easily connect to it.
-
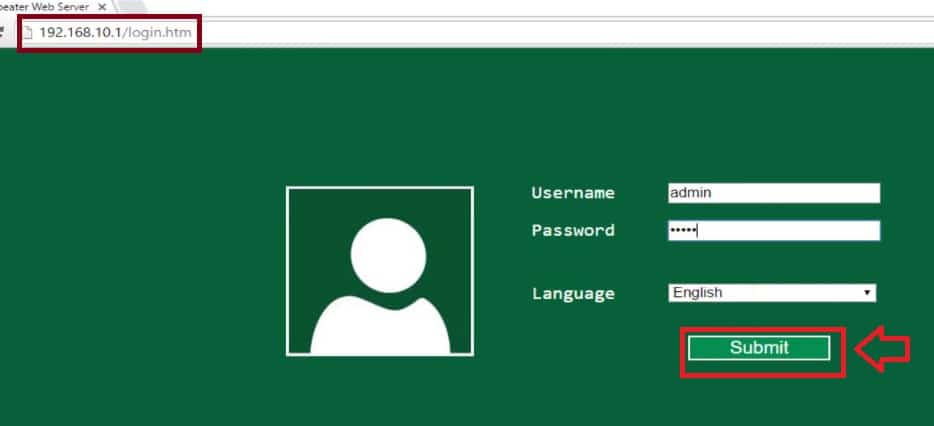
Now, let’s log in to the extender’s settings to configure it further. The default login credentials are as follows:
- IP Address: 192.168.10.1
- Username: admin
- Password: admin
-
Open your web browser and enter the login IP address (http://192.168.10.1). After a few seconds, the login window will appear, prompting you for authentication.
-
Enter the provided username and password (admin) and choose your preferred language. Then, click the submit button.
-
Congratulations! You have successfully logged in to your WiFiblast Range Extender. Now, let’s connect it to your existing WiFi network to extend its range.
-
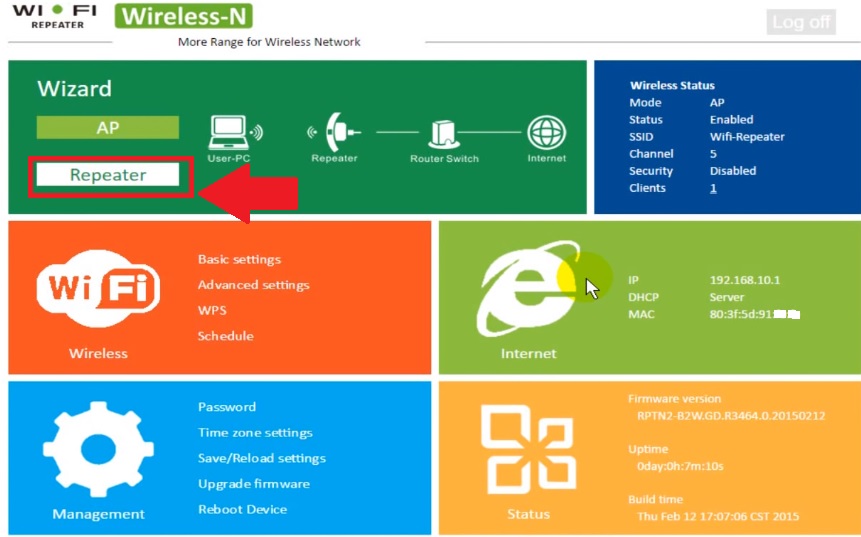
In the extender’s dashboard, you will find various hardware and software information, such as the LAN IP address, MAC address, and current wireless mode. Click on the “Repeater” button to scan for available WiFi networks.
-
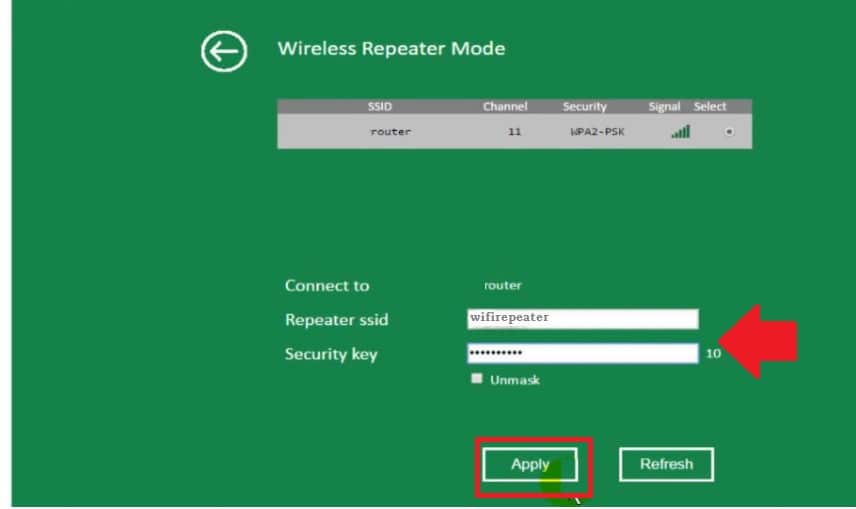
From the list of available networks, select your existing WiFi network. Enter your current WiFi password and click the apply button.
-
In the next step, you will need to set up a new WiFi SSID and password for the extended signal. You can use the same name as your main WiFi network and ensure that the SSID and password are identical to your existing network.
-
Once you have applied the changes, confirm the configuration details, and click the OK button to reboot the repeater device.
-
After a few minutes, check your mobile or laptop’s WiFi network and scan for the repeater network. You will now have a stronger and more extended WiFi signal to enjoy.
Placement is Key
To ensure optimal WiFi speed and connectivity, proper placement of your WiFiblast Range Extender is crucial. Find a location where the extender can receive at least a 50% signal from your host WiFi network. For more detailed placement recommendations, refer to the extender’s placement guide.
Troubleshooting WiFi Blast Range Extender
If you encounter any issues during the configuration or afterwards, troubleshooting can help you resolve them. Here are some common problems and their solutions:
WiFi Blast Login IP Address Not Working
If you are facing difficulties accessing the login IP address or experiencing a slow response, follow these steps to resolve the issue:
- Make sure the default login IP address printed on your repeater device sticker has not been changed.
- Check that your PC or laptop’s LAN IP configuration is set to DHCP mode or use a static IP address within the same default login IP series. For example, if the range extender login IP is 192.168.10.1, use 192.168.10.2 or 192.168.10.254 as your PC/Laptop LAN Static IP.
- If the problem persists, refer to the WiFi Blast manual for LAN network configuration steps.
How to Factory Reset WiFI Blast Range Extender?
If your repeater device frequently disconnects from the access point or if you’ve forgotten your login password, you can perform a factory reset. This will restore the device to its default settings. Follow these steps:
- Locate the small reset button on the repeater device.
- Plug the repeater device into a power socket.
- Press and hold the reset button for 10-15 seconds until the WiFi Blast LED starts blinking.
- The extender device will be rebooted and restored to its default mode after a few minutes.
- You can now log in to the router using the default settings, as mentioned earlier.
By following these troubleshooting steps, you can quickly resolve any issues you may encounter with your WiFiblast Range Extender.
Now that you know how to set up and log in to your WiFiblast Range Extender, say goodbye to WiFi dead zones and enjoy a strong and reliable internet connection throughout your home or office. Don’t let weak WiFi signals hold you back from achieving your online goals. Boost your signal today with WiFiblast!
Remember, a WiFiblast Range Extender is only as good as its setup. Follow the steps outlined in this article for a seamless and efficient installation process. Say hello to better WiFi coverage and bid farewell to frustrating dead zones. It’s time to take control of your internet connection and experience the difference!


